How to copy music from PC to iPhone without using iTunes
Hehe, you will need to use the SharePod at http://www.getsharepod.com/ and everything will be solved ;-)
Showing posts with label iphone. Show all posts
Showing posts with label iphone. Show all posts
Jun 21, 2008
How to setup GCS Global Mail with iPhone
Incoming Mail Server
Host Name: mail.globalcybersoft.com
User Name: xxx@globalcybersoft.com
Password: xxx
Outgoing Mail Server
Host Name: mail.globalcybersoft.com
Port: 25
User Name: xxx@globalcybersoft.com
Password: xxx
Use SSL: OFF
Host Name: mail.globalcybersoft.com
User Name: xxx@globalcybersoft.com
Password: xxx
Outgoing Mail Server
Host Name: mail.globalcybersoft.com
Port: 25
User Name: xxx@globalcybersoft.com
Password: xxx
Use SSL: OFF
Jun 7, 2008
How to disable autocorrect function in iPhone
If you have used the iPhone, you'll see the autocorrect/predict text function is very annoyned (for VNese text)
To disable this,
Edit the file /Applications/Preferences.app/Keyboard.plist and add following line
<dict>
<key>cell</key>
<string>PSSwitchCell</string>
<key>default</key>
<integer>0</integer>
<key>defaults</key>
<string>com.apple.Preferences</string>
<key>key</key>
<string>KeyboardAutocorrection</string>
<key>label</key>
<string>Enable Autocorrection</string>
</dict>
The Keyboard.plist is in binary format, you need to convert it into XML and then edit and then convert it back to binary format. Use the following URL for doing such conversion
- Online: http://iappcat.com/plist/bin2xml
- Offline (need to have PERL): http://scw.us/iPhone/plutil
After all, go to the Keyboard setting and turn off the Autocorrect function.
For iPhone 2.0, you basically rename whatever dictionary file you want to disable the autocorrect function for:
- start Mobile Terminal (or use SSH)
- become root using
su(the password is alpine) cd /System/Library/TextInput/mv TextInput_en.bundle TextInput_en_bak.bundle(for English)- The autocorrect feature for English should now be disabled
Have fun
Apr 27, 2008
Get iPhone Filesystem via SSH
The following code snippet shows you how to get the iphone filesystem via SSH. The file system will be put at /usr/local/share/iphone-filesystem
mkdir -p /usr/local/share/iphone-filesystem |
Feb 18, 2008
iPhone Jailbreak (1.1.1 & 1.1.2)
Firmware 1.1.1
- Slide the slider to the right to execute the Emergency Calling
- Dial *#307# and select Call. iPhone will display a receiving call, clear the entered number using the X button (in the top right) and the press 0, and Call button. iPhone will receive a call number 1, select Answer, Hold, and then Decline.
- Now you are in the Keypad of the iPhone, select Contact to see All Contact screen.
- In the All Contact screen, press + (on the top-right) to Add contact. In the box First Last, enter what ever you want for the name of the contact. Select the box Add new URL and enter prefs: for the URL, Save and then select Add new URL again to enter new url, this time, enter http://jailbreakme.com and the Save the contact.
- Then in the contact screen, select the prefs: to go into the Settings of iPhone.
- Select General -> Auto-Lock -> Never
- Then back to the Settings creen, select Wifi to connect Wifi for the iPhone. After all, press the Home button to exit.
- Now you are in the Activate iPhone screen, move the slide to go into Emergency Call, press 0 -> Call, Answer, Hold, Decline.
- Select the contact and click on the url http://jailbreakme.com to open jailbreakme.com website, scroll down to the end of the page, select Install AppSnapp?
- You will be back to Activate iPhone, use the Emergency Call to go back into the Contact screen of iPhone, if you see the downloading progress bar, you are successfully. BTW, wait for a minute to download the AppSnapp?. If not, try again until success. After all, the iPhone will automaticall restart and now you are at the Springboard of the iPhone.
- Your iPhone has been unlock with Firmware 1.1.1
Firmware 1.1.2
In summary we will go through following step- Downgrade to 1.1.1
- Jailbreak 1.1.1
- Upgrade to 1.1.2
- Jailbreak 1.1.2
Prerequisite
- Wireless network
- Java: http://www.java.com/en/download/index.jsp
- iTunes: http://www.apple.com/itunes/download/
- iBrickr0.9: http://ibrickr.com/downloads/ibrickr_v0.91.zip
- Jaibreak 1.1.2: http://conceitedsoftware.com/iphone/1.1.2-jailbreak.zip
- iPhone Firmware 1.1.1: http://appldnld.apple.com.edgesuite.net/content.info.apple.com/iPhone/061-3883.20070927.In76t/iPhone1,1_1.1.1_3A109a_Restore.ipsw
- iPhone Firmware 1.1.2: http://appldnld.apple.com.edgesuite.net/content.info.apple.com/iPhone/061-4037.20071107.5Bghn/iPhone1,1_1.1.2_3B48b_Restore.ipsw
Downgrade to Firmware 1.1.1
- Connect the iPhone with PC, hold the Power (the top right button) and Home (central button) at the same time until the iPhone screen turn off, continue holding those button until the iPhone screen turn on and then release the Power button but continue holding Home button until iTunes recognize the iPhone is in the Recovery Mode.
- Hold Shift and click into the Restore button in iTunes, and then select the Firmware 1.1.1 which you have downloaded before. Wait until iTunes restore the iPhone and then it display the error messsage like 'Error 1015', click OK and then another message is displayed, keep click OK. After all, turn off iTunes but still plug the cable in.
- Open Task Manager and end the process iTunesHelper.exe
- Unzip iBrickrs0.9 which you have downloaded before and execute the iBrickr.exe. Select Boot the Phone in the iBrickr window. At this time, the iPhone screen will display in red color, leave it alone and then the iPhone will reboot. This time, iPhone will display the Activate screen, turn off iBrickr and un-plug the cable.
- Your iPhone has been downgraded to Firmware 1.1.1
Jailbreak Firmware 1.1.1
Follow the step at Firmware 1.1.1
Upgrade to Firmware 1.1.2
- After Jailbreak firmware 1.1.1, on the Springboard of iPhone select Installer, select tab Install, select Tweak (1.1.1) -> Oktogrep and press Install to install it. After the installation finished, press OK button, press Home button to exit the Installer and wait for about 10 seconds. Restart your iPhone by press and hold the Power button and then move the Slider to turn off. Restart iPhone, connect the iPhone with PC and execute iTunes
- On iTunes, after it recognized iPhone, hold Shift and click the Update button, select the Firmware 1.1.2 which you have downloaded before to update. After the Update finished, close iTunes and unplug the cable from the PC and then re-plug the cable to the PC.
- Your iPhone has been upgraded to Firmware 1.1.2
Jailbreak 1.1.2
- Unzip the Jailbreak 1.1.2, and execute the windows.bat (you must have Java installed). The 1.1.2 Jailbreak window appears, check the Install SSH, and enter root password is alpine. Then click the Jailbreak button. After the jailbreak finished, your iPhone will automatically reboot and you can get into the Springboard of iPhone.
- Your iPhone has been jailbreak with firmware 1.1.2 but without Phone and SMS function.
Feb 14, 2008
Create a Dashboard in iPhone
You have seen the dashboard in iPhone UI or in Mac OS X UI. The following code snippet shows you how to create a dashboard in iPhone native application.
The code is Object C format
- (UIButtonBar *)createButtonBar
{
UIButtonBar *myButtonBar;
myButtonBar = [[UIButtonBar alloc]
initInView: self
withFrame: CGRectMake(10.0f, 380.0f, 300.0f, 100.0f)
withItemList: [self buttonBarItemList]];
[myButtonBar setDelegate: self];
// This set the style of the bar
[myButtonBar setBarStyle: 3];
// This set the tracking mode (effect when clicking on the button of the bar)
[myButtonBar setButtonBarTrackingMode: 1];
int buttons[3] = { 1, 2, 3 };
[myButtonBar registerButtonGroup: 0 withButtons: buttons withCount: 3];
[myButtonBar showButtonGroup: 0 withDuration: 0.0];
/* This set the layout of the button */
int tag;
for (tag = 1; tag < 4; tag++)
{
[[myButtonBar viewWithTag: tag]
setFrame: CGRectMake(10.0f + ((tag-1)*(80.0 + 10.0)), 1.0f, 100.0f, 80.0f)
];
}
return myButtonBar;
}
The item list of the button bar
- (NSArray *)buttonBarItemList
{
return [NSArray arrayWithObjects:
[NSDictionary dictionaryWithObjectsAndKeys:
@"buttonBarClicked:", kUIButtonBarButtonAction,
@"button_back.png", kUIButtonBarButtonInfo,
@"button_back_pressed.png", kUIButtonBarButtonSelectedInfo,
[NSNumber numberWithInt: 1], kUIButtonBarButtonTag,
self, kUIButtonBarButtonTarget,
@"Page 1", kUIButtonBarButtonType,
@"0", kUIButtonBarButtonType,
nil
],
[NSDictionary dictionaryWithObjectsAndKeys:
@"buttonBarClicked:", kUIButtonBarButtonAction,
@"button_open.png", kUIButtonBarButtonInfo,
@"button_open_pressed.png", kUIButtonBarButtonSelectedInfo,
[NSNumber numberWithInt: 2], kUIButtonBarButtonTag,
self, kUIButtonBarButtonTarget,
@"Page 2", kUIButtonBarButtonType,
@"0", kUIButtonBarButtonType,
nil
],
[NSDictionary dictionaryWithObjectsAndKeys:
@"buttonBarClicked:", kUIButtonBarButtonAction,
@"button_next.png", kUIButtonBarButtonInfo,
@"button_next_pressed.png", kUIButtonBarButtonSelectedInfo,
[NSNumber numberWithInt: 3], kUIButtonBarButtonTag,
self, kUIButtonBarButtonTarget,
@"Page 3", kUIButtonBarButtonType,
@"0", kUIButtonBarButtonType,
nil
],
nil];
}
The click message, which will handle the click event of the button bar
- (void)buttonBarClicked: (id) sender
{
}
And you will got a nice UI like this
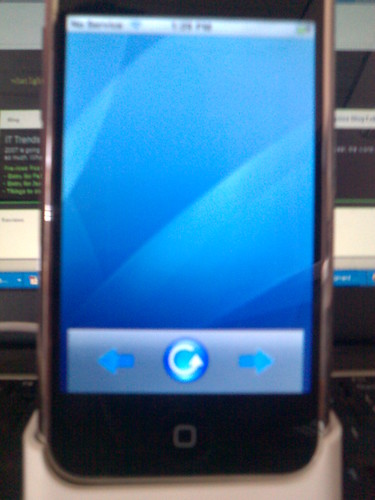
That's all, Have fun with iPhone & Object C coding 
Subscribe to:
Posts (Atom)